Study Dashboard
Monitor invitations, participants, notifications, and data for an active or planned study on the SMAAT platform.
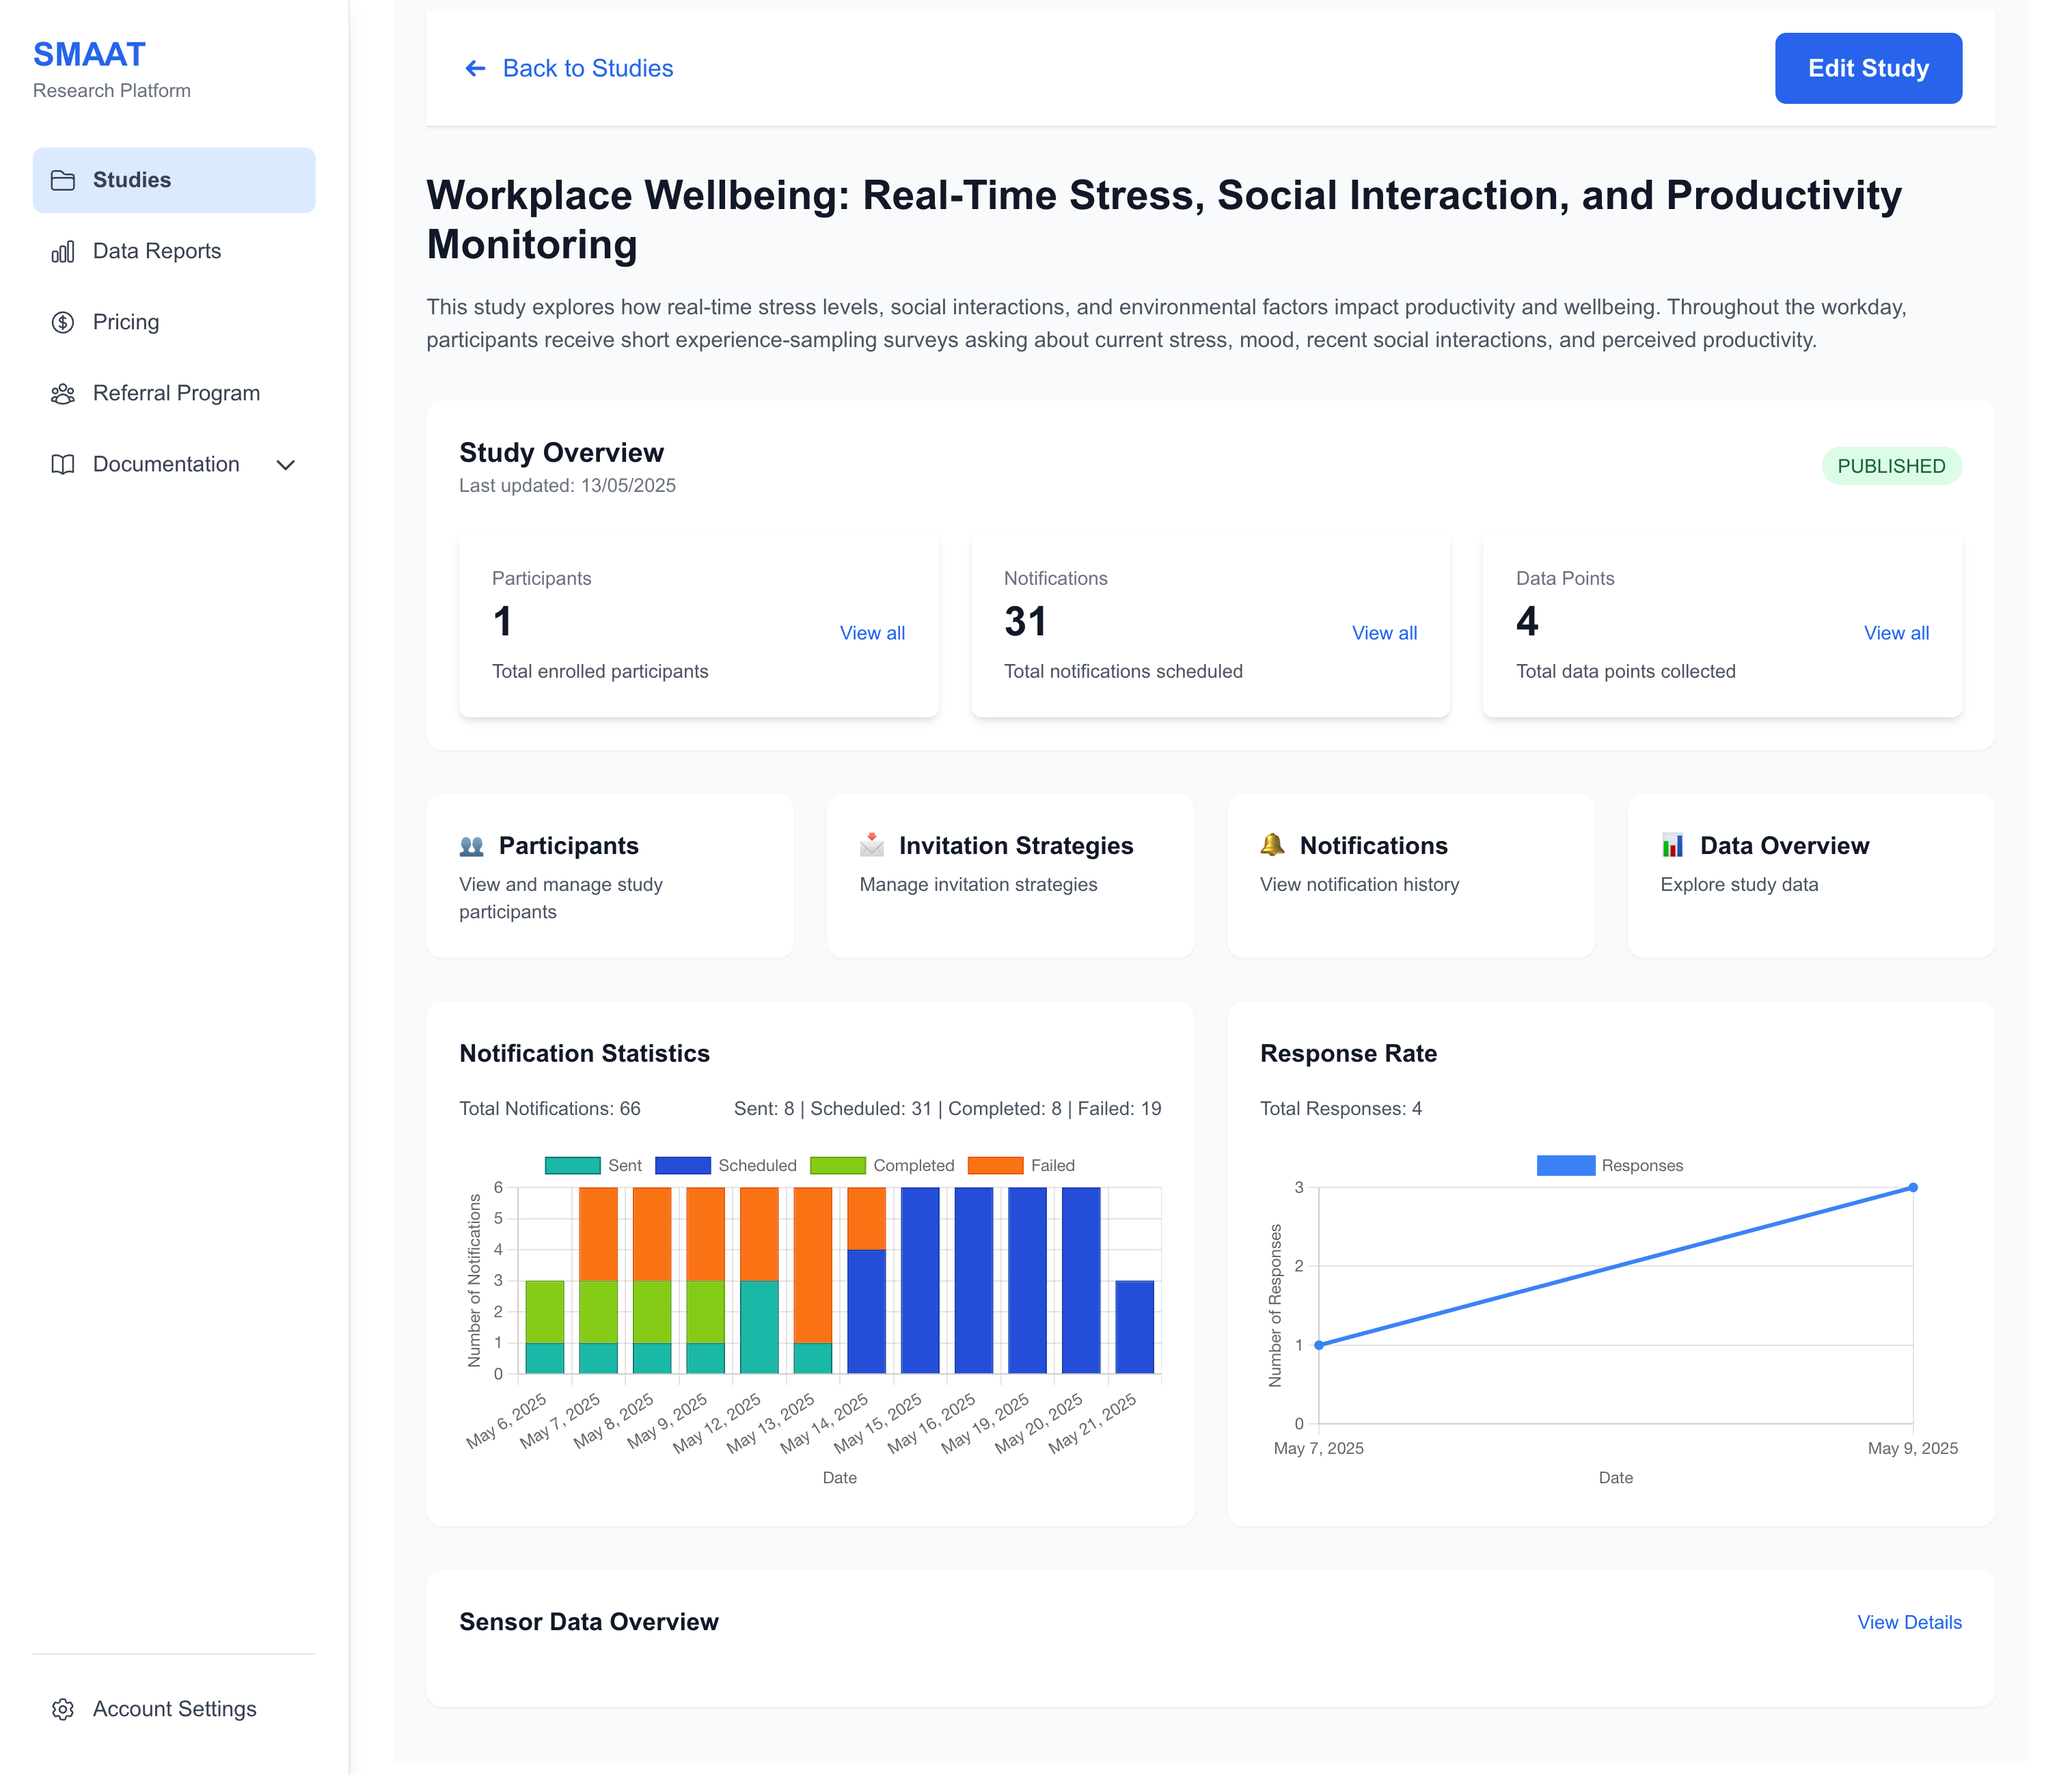
The Study Dashboard is the central hub for monitoring and managing an active or planned study on the SMAAT platform. It provides real-time insights into participant engagement, notification delivery, and data collection, empowering researchers to make informed decisions throughout the study lifecycle.
Access the Study Dashboard from a study card on the studies page https://smaat.eu/dashboard/studies. The dashboard provides a centralized interface for managing all aspects of a study, with sections for invitations, participants, notifications, and data analysis.
Managing Invitations
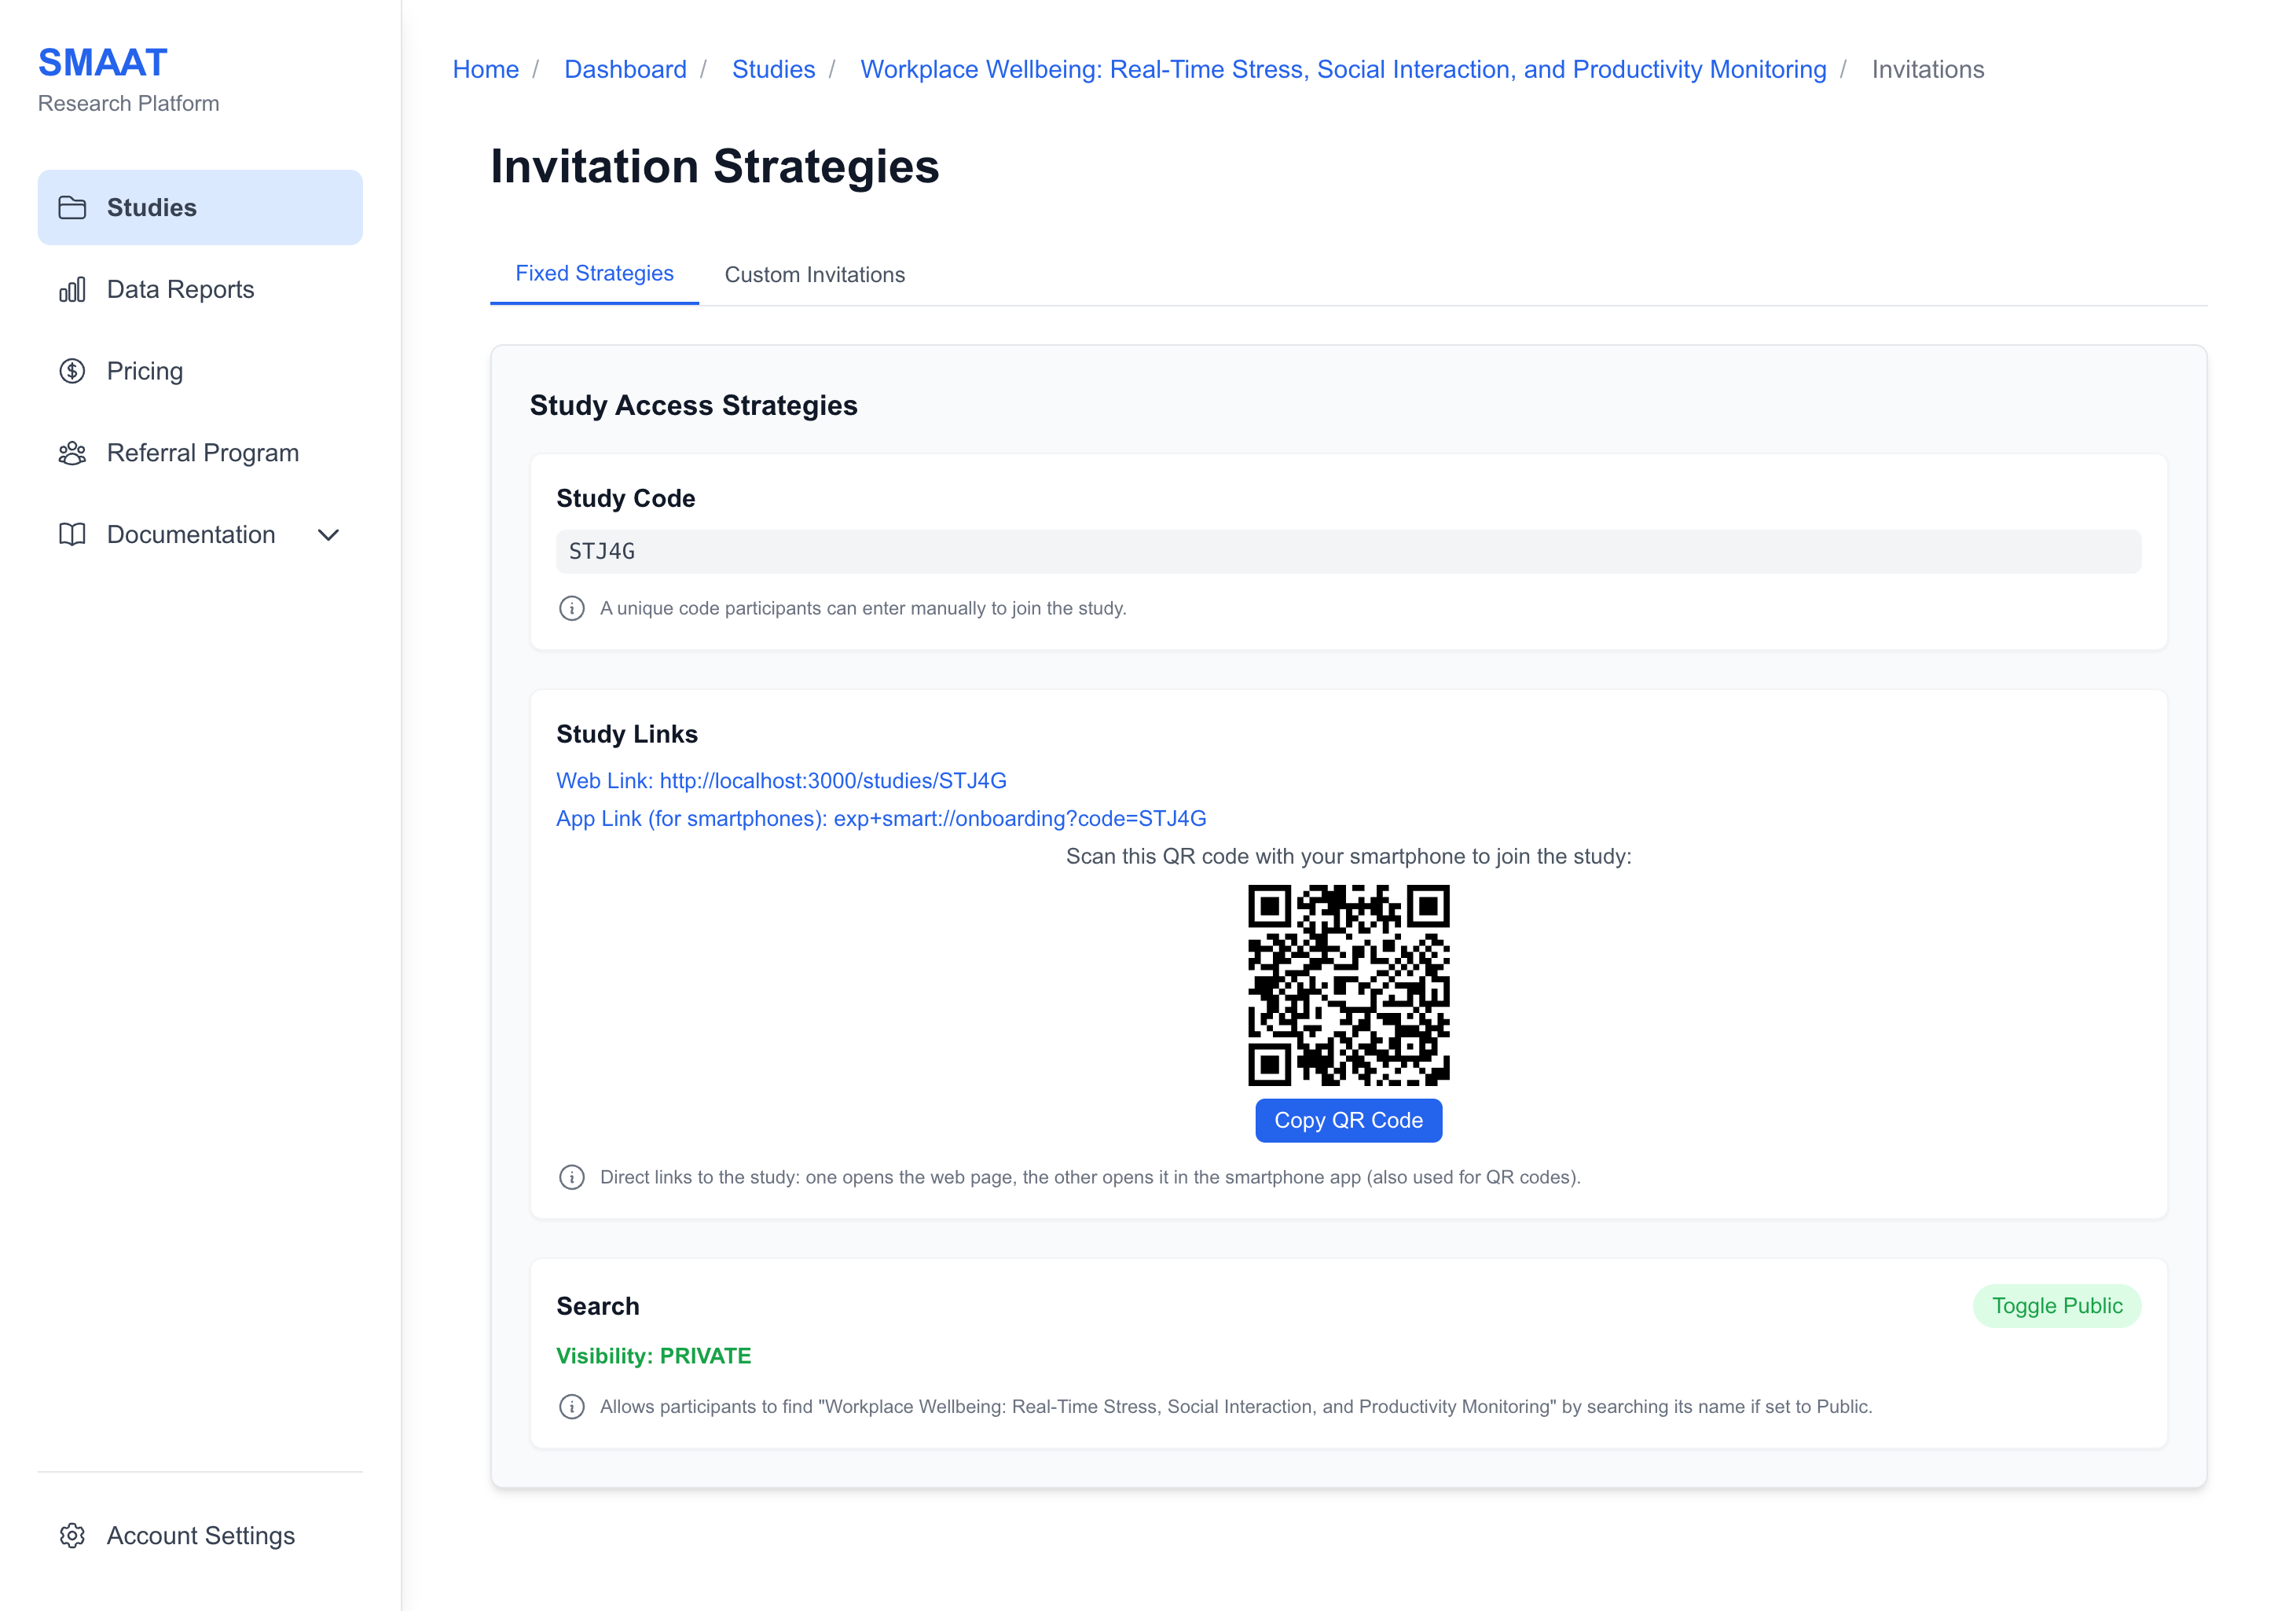
The Invitations section allows you to create and distribute invitations to recruit participants. It is divided into two tabs: Fixed Strategies and Custom Invitations.
Fixed Strategies
Fixed strategies provide a general invitation method for all participants:
- Study Code: A unique code (e.g., “STUDY123”) that participants can enter in the SMAAT app to join.
- Web Link: A link to the study’s public web page, containing information and instructions for joining.
- Direct Application Link: A link that opens the study in the SMAAT app after installation.
- QR Code: A scannable code linked to the direct application link, displayed on the web page and shareable.
- Public Study Option: Enable to make the study discoverable in the app’s search feature.
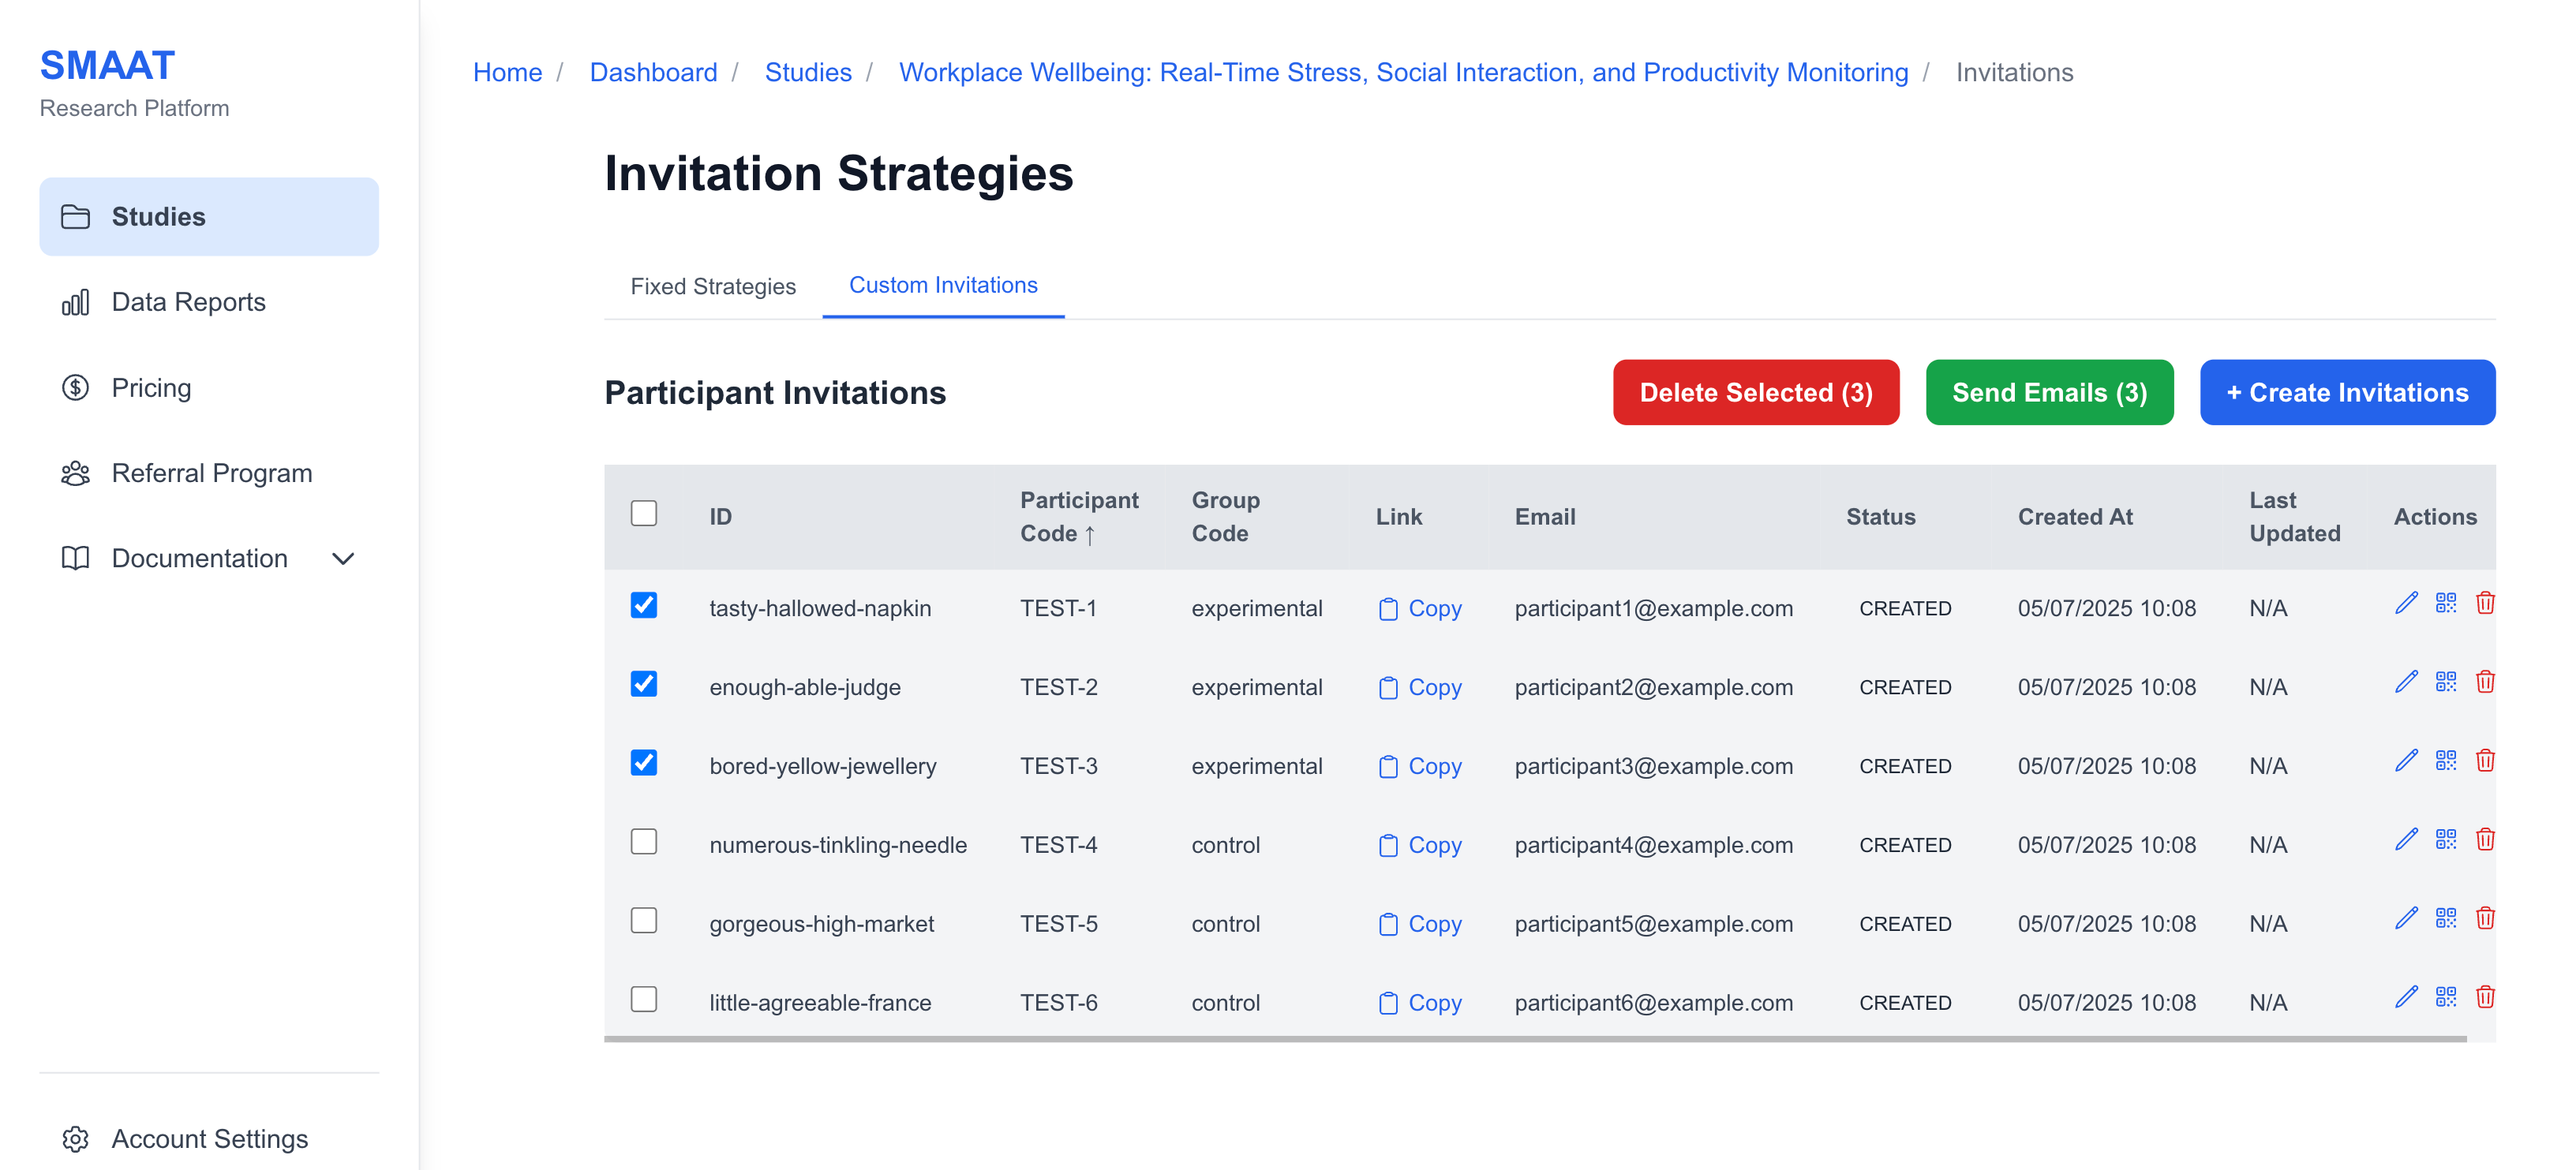
Custom Invitations
Custom invitations allow you to create individualized invitations for specific participants:
- Click “+ Create Invitations” to open a modal.
- Add invitations by uploading a CSV file or pasting a list with columns:
participantCode(optional, e.g., “P001”),groupCode(optional, e.g., “GroupA”), andemail(optional, for sending invitations). - Submit to generate invitation links and QR codes for each participant.
- Send invitations via email by selecting participants, clicking “Send Emails,” and customizing the email subject and body (in HTML) with placeholders
[INVITATION_LINK]and[STUDY_PAGE_LINK].
Managing Participants
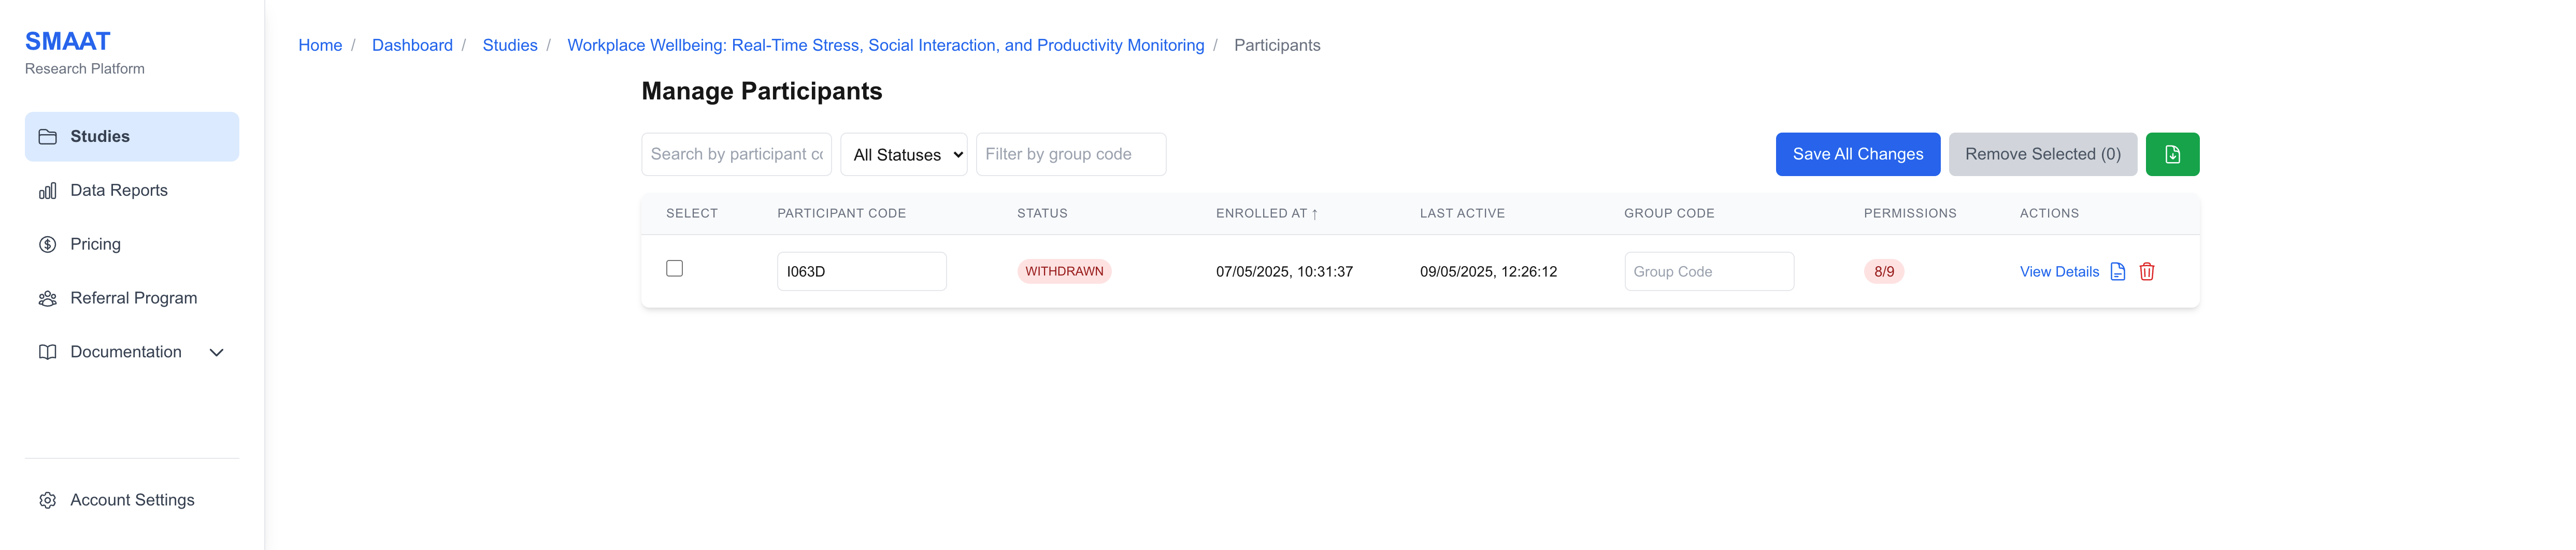
The Participants section provides a detailed overview of all participants enrolled in your study, with tools to filter, edit, and export participant data.
Participant Table
The participant table displays the following information:
- Participant Code: A unique identifier (e.g., “P123”), editable at any time.
- Status: Enrolled (active, receiving notifications), On Hold (paused), Completed (no further notifications), or Withdrawn (participant left the study).
- Enrolled At: Timestamp of when the participant joined.
- Last Active: Timestamp of the participant’s last survey response.
- Group Code: The participant’s assigned group, editable to change survey delivery.
- Permissions: Number of enabled permissions out of required ones, with a hover tooltip listing specific permissions (e.g., GPS, notifications).
- Actions: View details, edit notes, or delete the participant.
Participant Details Page
Click “View Details” to access a participant’s full profile, including:
- Stable ID: A permanent, unique identifier (unchanged even if the participant code is edited).
- Permissions Status: Detailed list of enabled/disabled permissions.
- Technical Details: Device token, system info, locale, device type, screen info, and app version.
- Notes: A text area for researcher notes (e.g., “Participant reported technical issues on day 3”).
- Notifications: A table of notifications sent to the participant, filterable by status (Scheduled, Sent, Completed, Failed).
Monitoring Notifications
The Notifications section allows you to track all notifications sent or scheduled for your study, with options to filter, edit, delete, and export data.
The notification table includes:
- Participant Code: The recipient’s identifier.
- Survey Title: The linked survey (e.g., “Daily Mood Survey”).
- Notification Title and Body: The text displayed to the participant.
- Status: Scheduled (not yet sent), Sent (delivered), Completed (survey submitted), or Failed (delivery error).
- Scheduled At: When the notification is set to send.
- Sent At: When the notification was actually sent.
- Reminders: Any linked reminder notifications.
- Actions: Edit or delete scheduled notifications, or delete sent notification records.

Next Steps
With your study actively monitored through the Study Dashboard, explore the following sections to analyze and report on your collected data on the SMAAT platform: