Designing Surveys
Surveys are a cornerstone of the SMAAT platform, enabling researchers to collect active participant data through customizable, mobile-friendly questionnaires.
The Surveys tab in the study edit page provides a comprehensive interface for designing surveys, configuring notification schedules, selecting sensors to collect data during responses, and previewing the participant experience. This section offers an in-depth guide to creating engaging surveys that maximize participant response rates and data quality.
Surveys can range from simple daily check-ins to complex multi-screen questionnaires, with support for various question types and flexible notification triggers. By integrating sensor data collection, you can enrich survey responses with contextual information, such as a participant’s location or activity level at the time of response.
Designing the Survey Protocol
To create a survey, navigate to the Surveys tab in the study edit page. Start by defining the survey’s metadata:
- Title: A clear name for the survey (e.g., “Morning Mood Survey”).
- Description: Instructions or context for participants (e.g., “Please complete this survey each morning to report your mood and energy levels.”).
- Group Code (Optional): A code to restrict the survey to a specific participant group. Leave blank to send to all participants.
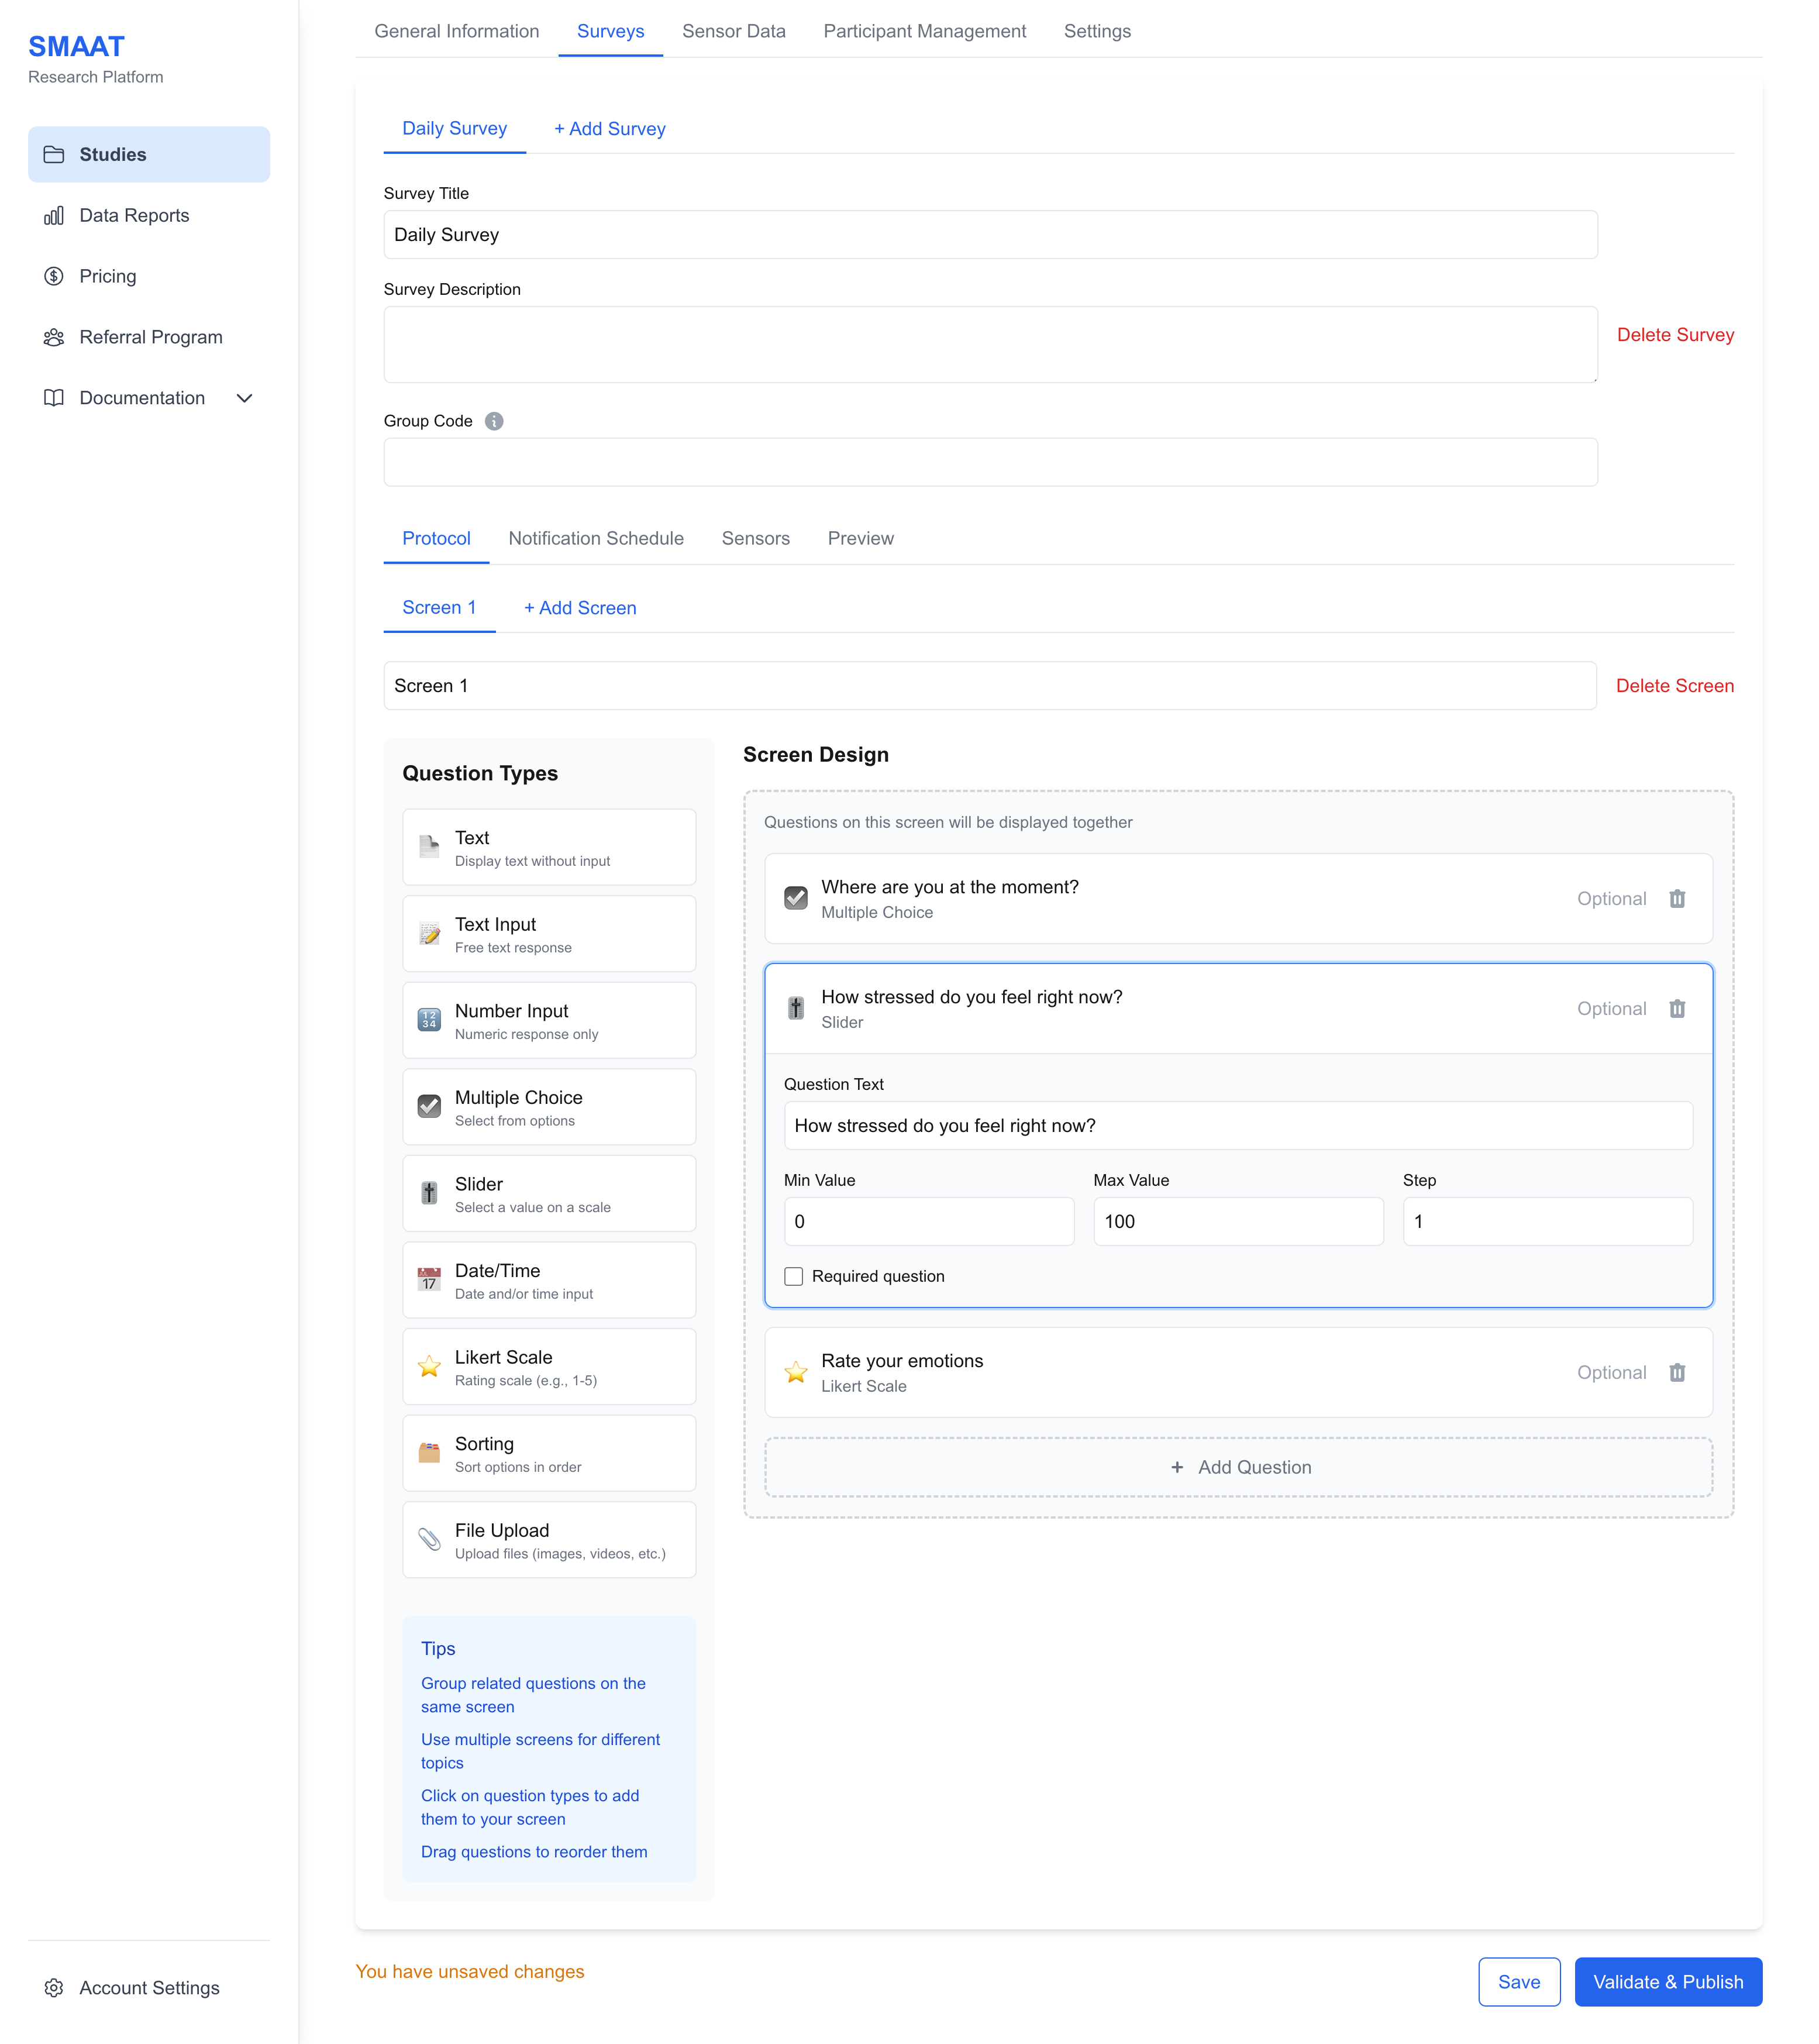
Surveys are organized into screens, each containing one or more questions. Participants can navigate screens forward and backward, providing flexibility in how they complete the survey. You can rename screens (e.g., “Mood Questions,” “Activity Questions”) and reorder or delete them as needed.
Adding Questions
Add questions using the left panel or the “+ Add Question” button. The platform supports a variety of question types to suit different research needs:
- Text: Display instructional or informational text without requiring input (e.g., “Please answer the following questions about your day.”).
- Text Input: Collect free-text responses (e.g., “Describe your current mood in a few words.”).
- Number Input: Restrict responses to numeric values (e.g., “How many hours did you sleep last night?”).
- Multiple Choice: Allow selection from predefined options (e.g., “How would you rate your energy level? High/Medium/Low”).
- Slider: Collect responses on a continuous scale (e.g., “Rate your stress level from 0 to 100.”).
- Date/Time: Capture date and/or time inputs (e.g., “When did you wake up today?”).
- Likert Scale: Use a rating scale (e.g., “Rate your agreement from 1 (Strongly Disagree) to 5 (Strongly Agree).”).
- Sorting: Ask participants to rank options (e.g., “Sort these activities by preference: Work, Exercise, Socializing.”).
- File Upload: Allow participants to upload files, such as images or videos (e.g., “Upload a photo of your workspace.”).
Questions can be reordered by dragging and dropping, and screens can be added or deleted using the “+ Add Screen” and “Delete Screen” buttons.
This is an example of instructional text displayed to participants.
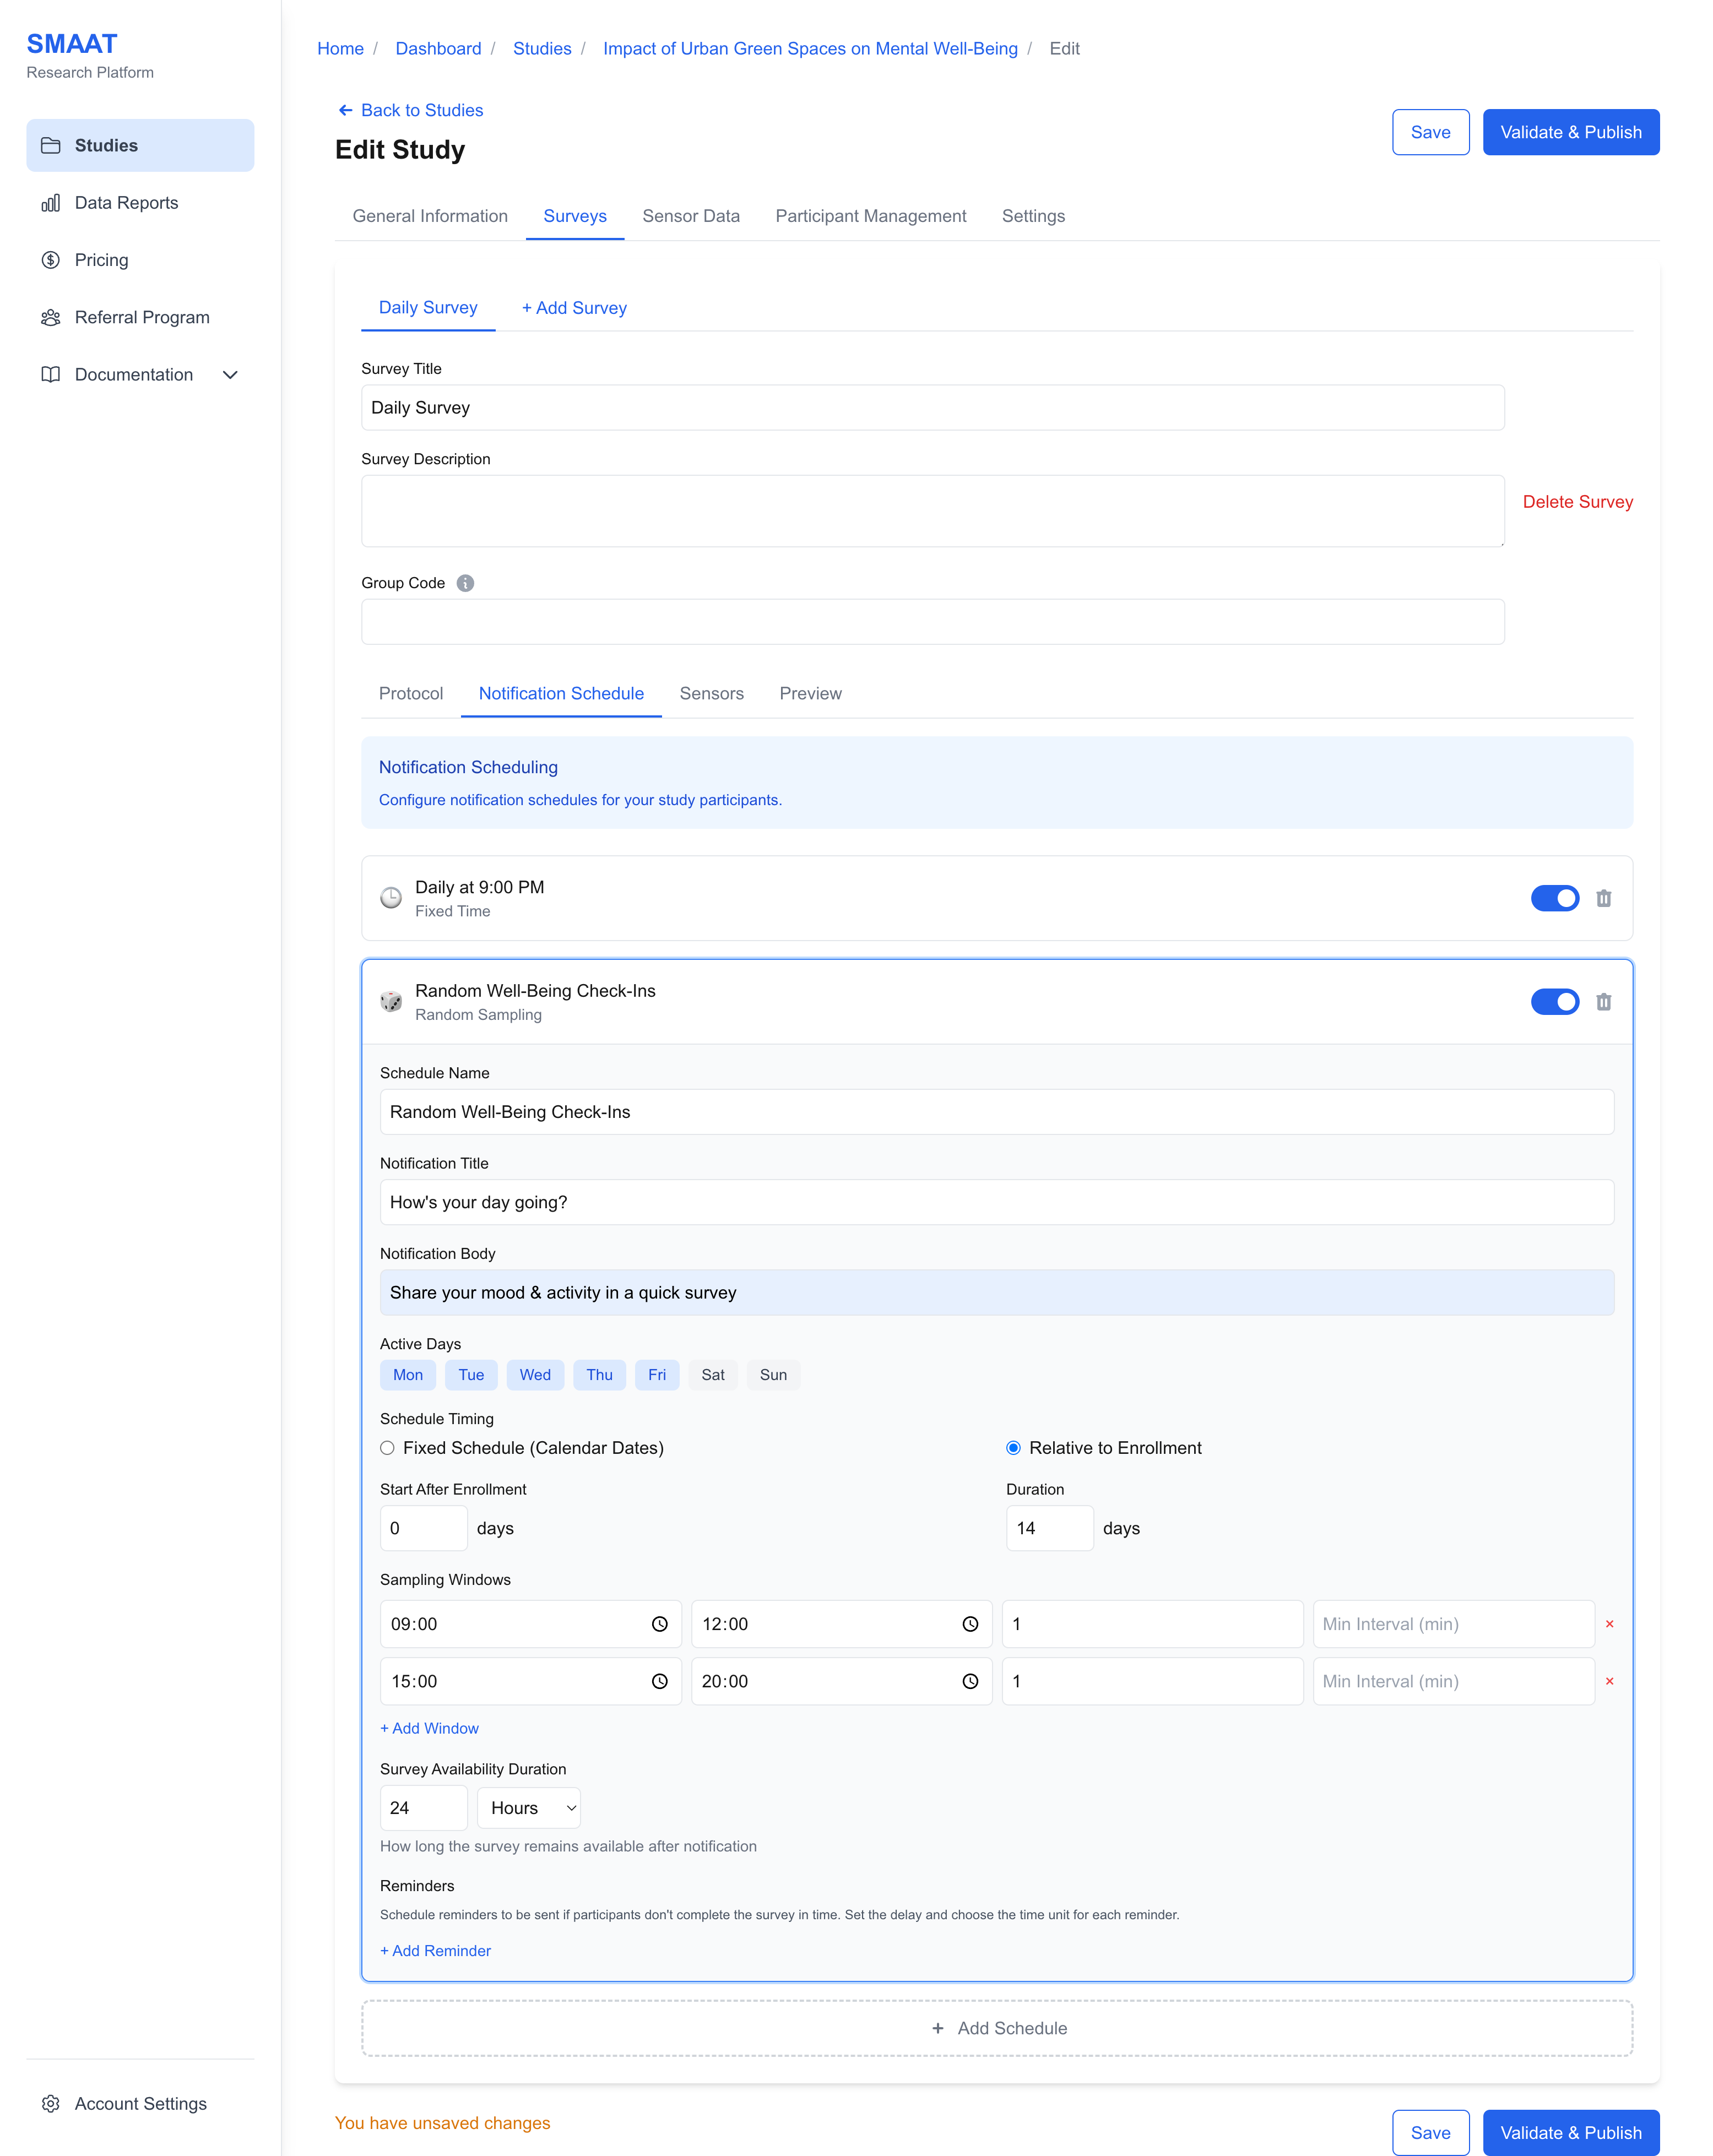
Configuring Notification Schedules
Notifications prompt participants to complete surveys, and the Notification Schedule tab allows you to define when and how these prompts are sent. Each notification is linked to a specific survey and includes a schedule name, title, and body displayed to participants. The platform supports multiple schedule types to accommodate various research designs.
Notification Types
- Fixed Time: Send notifications on specific days and times, either on fixed calendar dates or relative to each participant’s enrollment date.
- Settings: Select active days (e.g., weekdays only), set start/end dates or days relative to enrollment, and specify notification times. Define survey availability (default: 24 hours) and add reminders for incomplete surveys.
- Example: A daily mood survey sent at 8 PM for 7 days after enrollment, with a reminder 2 hours later if not completed.
- Random Sampling: Send notifications at random times within defined time windows, ensuring a minimum interval between notifications.
- Settings: Define time windows (e.g., 9 AM–5 PM), number of notifications per window, and minimum interval (e.g., 1 hour).
- Example: Three random notifications between 10 AM and 6 PM daily, with at least 2 hours between each.
- Interval-Based: Send notifications at regular intervals between a start and end time, with a maximum number of notifications.
- Settings: Set start/end times, interval (e.g., every 4 hours), and maximum notifications.
- Example: A survey every 3 hours from 8 AM to 8 PM, up to 4 times daily.
- Event-Based: Trigger notifications based on study events, such as enrollment or study completion, or custom events via API.
- Settings: Choose an event (e.g., “Start of Study”), add a delay (e.g., 1 hour after enrollment), or define a custom event with a POST request payload.
- Example: An onboarding survey sent immediately after enrollment and a debriefing survey 14 days later.
- Geolocation-Based: Trigger notifications when participants enter or leave a defined location, using geofencing.
- Settings: Set active days and time windows, add locations on a map, and configure radius and event type (enter/exit). Adjust markers by dragging or editing popups.
- Example: A survey triggered when a participant enters a workplace with a 100-meter radius, active weekdays from 9 AM to 5 PM.
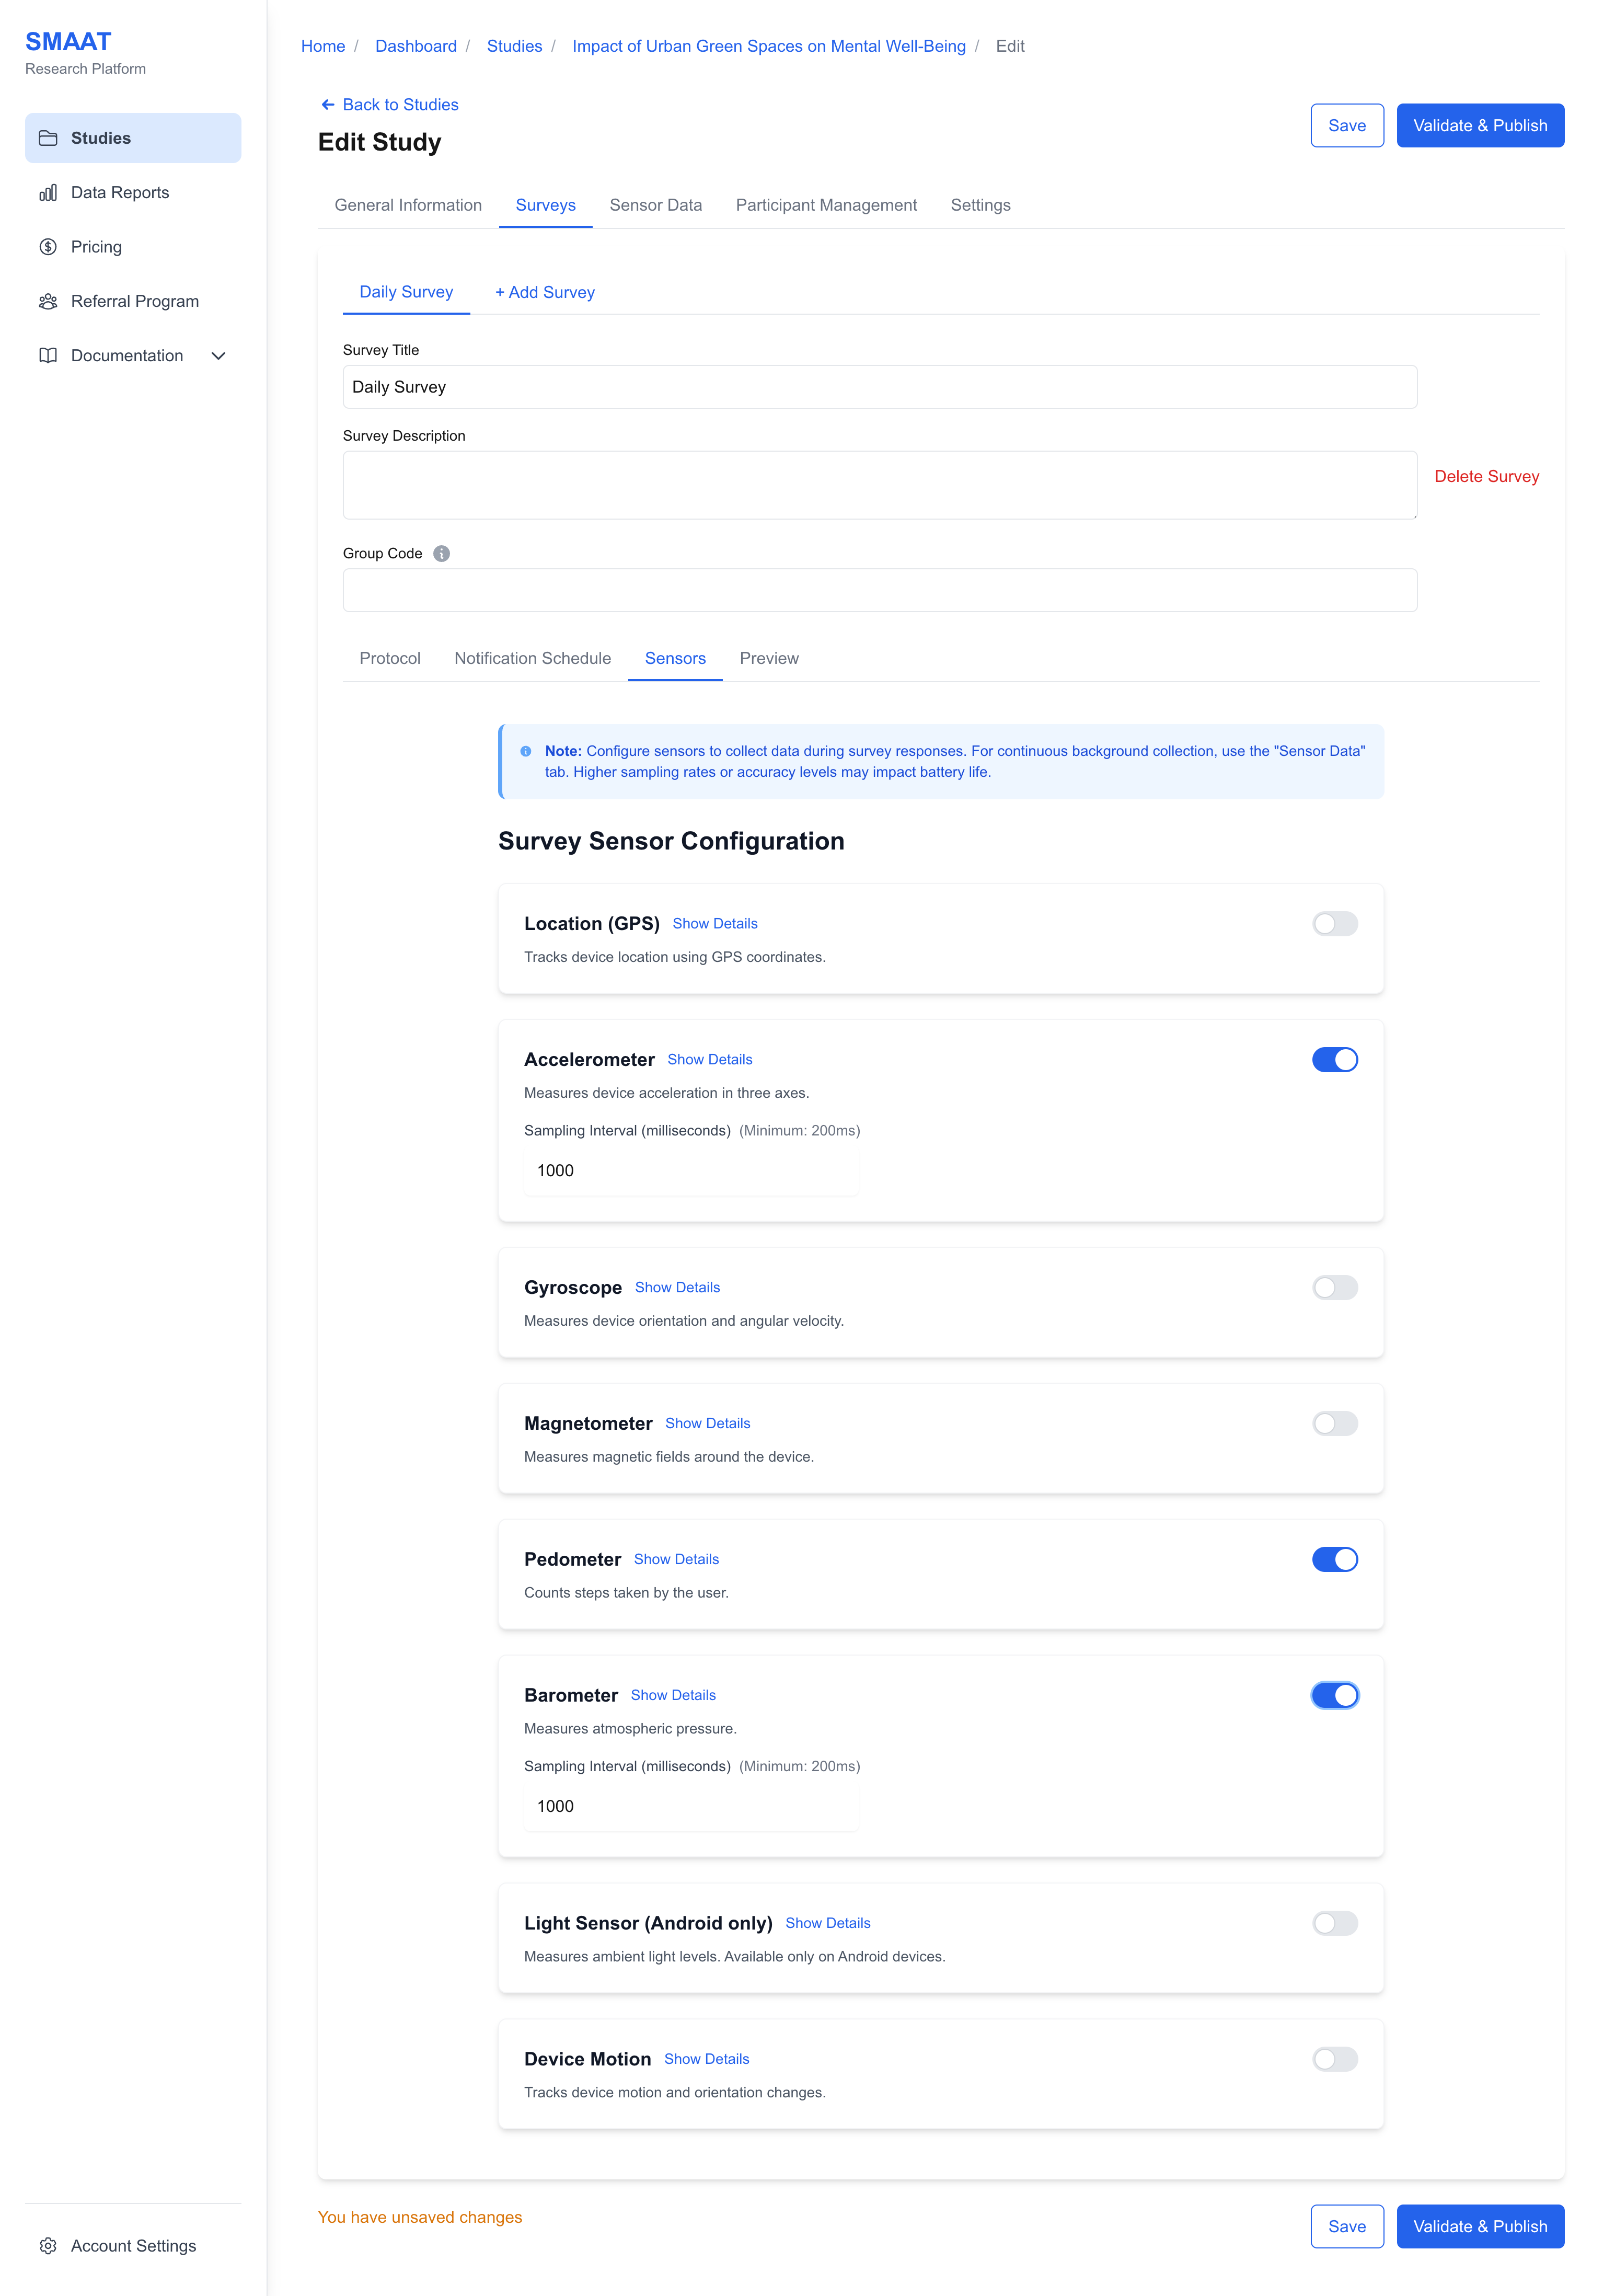
Configuring Sensors for Surveys
The Sensors tab allows you to collect contextual data during survey responses, enhancing the richness of your dataset. Available sensors include:
- Location (GPS): Tracks the participant’s geographic coordinates.
- Accelerometer: Measures device acceleration in three axes, useful for detecting movement.
- Gyroscope: Tracks device orientation and angular velocity.
- Magnetometer: Measures magnetic fields around the device.
- Pedometer: Counts steps taken by the participant.
- Barometer: Measures atmospheric pressure, useful for altitude detection.
- Light Sensor (Android only): Measures ambient light levels.
- Device Motion: Tracks combined motion and orientation changes.
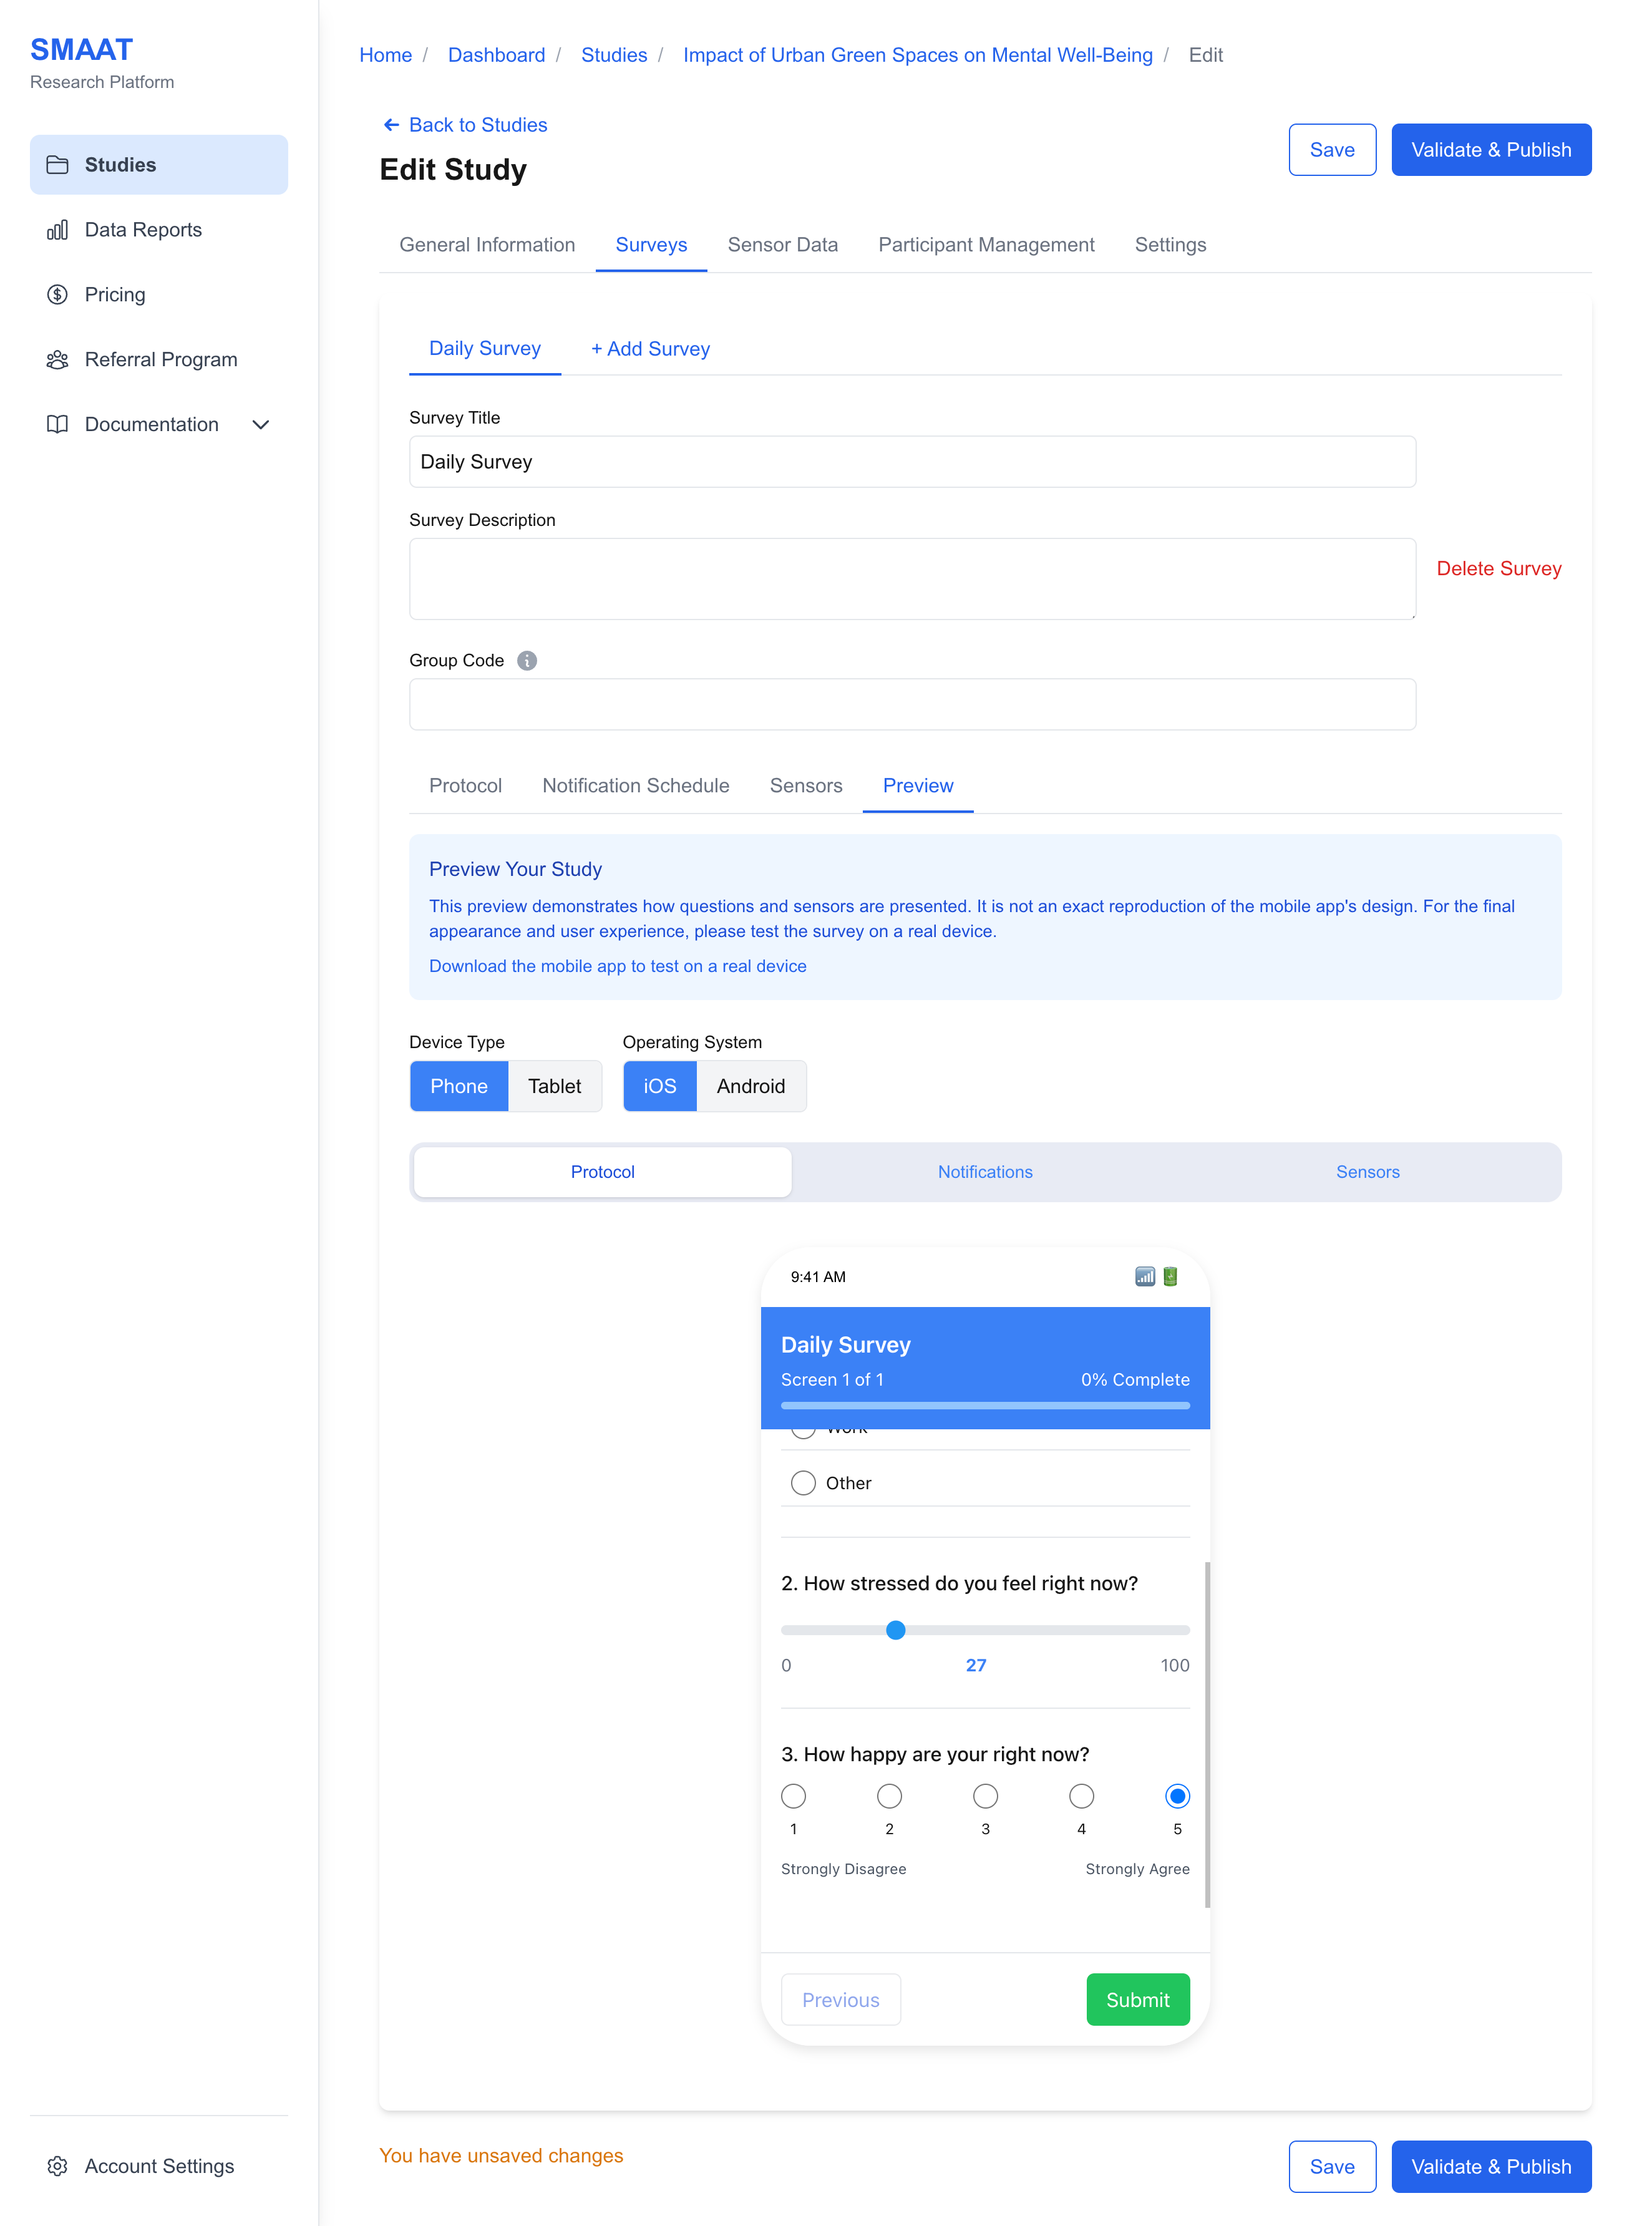
Previewing Surveys
The Preview tab allows you to simulate how surveys, notifications, and sensor permissions will appear to participants on mobile devices. This feature helps you verify the user experience before publishing the study.
- Survey Preview: View how questions are organized across screens, with options to switch between screens.
- Notification Preview: Click “Show Sample Notification” to simulate a notification arriving on a smartphone.
- Sensor Preview: See how permission requests (e.g., for GPS) are presented to participants.
- Customization: Toggle between device types (phone/tablet) and operating systems (iOS/Android) to test different scenarios.
Next Steps
With your surveys designed and notifications configured, explore the following sections to continue building and managing your research on the SMAAT platform: